Preparando a placa
1) Corte um retângulo interno deixando somente duas fileiras externas de furos na placa, mais uma margem de 5 a 6 mm. IMPORTANTE: corte bem na reta de furos. Se cortar entre as fileiras, não terá margem nenhuma para aumentar os furos! Lixe depois se precisar acertar e tirar pontas. Para cortar pode usar uma serra de joalheiro ou um estilete, passando várias vezes.
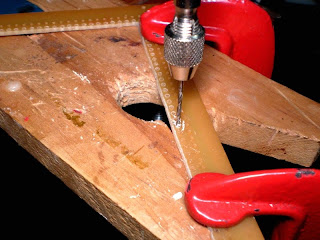
2) Alargue cada furo mais perto do vão central usando uma broca fina de 1,2. Compra-se em fornituras, lojas que vendem ferramentas para relojoeiros e joalheiros. Compre também o suporte para usar a broca.
Preparing the perfboard
1) Cut out a rectangle from the inner part of the board, leaving 2 rows of perforations and about 3/16" external margin for glueing. IMPORTANT: cut ON the perforation line. If you try to cut between the lines, you'll have NO margin to enlarge the holes later, believe me! :) Sand the inner part to make it smooth and straigh. You can cut the board using a jeweler's saw or a craft knife (several cuts might be necessary. No need to use pressure) . Sand afterwords to make it even or eliminate 'dents'
2) Enlarge the inner row of perforations using a small drill and 1/16" drill bit.
 |
| Aumentando os furos com uma broca. Enlarging the inner perforations with a hand drill. |
Montando a Moldura
O primeiro passo é montar a moldura onde será 'tecida' a palhinha.
Material usado:
- placa de fenolite perfurada... hã???... kkkkk! é esse nome estranho mesmo! Compra-se em lojas especializadas em material de eletrônica. Não é muito caro e têm de vários tamanhos. A minha mede 10 x 15 cm.
- ripas de madeira finas, usei cedrinho. Evite a balsa porque é muito macia e não vai dar firmeza à moldura! Usei as que tinha, de 1, 2 e 3 mm de espessura. Recomendo usar só as de 1 e 3 ou 1 e 2.
1a)- 2 tiras de madeira: 1o,6 x 1,2 cm x 1 ou 2 mm
2a)- 2 tiras de madeira: 10, 6 x 0,9 cm x 1 mm
3a)- 2 tiras de madeira: 10,6, x 1,2 cm x 2 ou 3 mm
1b)- 2 tiras de madeira: 15,5 x 1,2 x 1 ou 2 mm
2b)- 2 tiras de madeira: 15,5 x 0,9 cm x 1 mm
3b)- 2 tiras de madeira: 15,5 x 1,2 cm x 2 ou 3 mm
- cola branca ou de madeira
*Faça uma moldura retangular primeiro com as tiras mais grossas (3 a e b).
*Depois faça com as tiras mais finas e mais estreitas (2 a e b), sendo que elas ficam alinhadas com a parte EXTERNA da moldura.
*Cole agora a placa de fenolite.
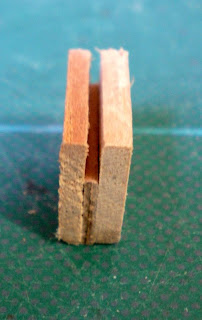
*Finalmente uma terceira moldura com as tiras de madeira restantes (1 a e b). Estas ficam por cima. Veja na foto abaixo um corte transversal do "sanduíche" de madeira.
*Reforce com mais uma linha de cola pelo lado de dentro e de baixo, entre a placa de fenolite e a moldura de madeira para garantir a firmeza. Segure com prendedores de roupa e deixe secar bem.
*Lixe bem para deixar lisa e evitar lascas prendendo o fio. Passe termolina leitosa para selar e lixe novamente. Eu faria os cantos arredondados agora. Ouça este conselho!... :)
Making the Frame!
The first step is to make the frame where you'll 'weave' the caning.
Materials used:
- pre-punched IC spacing perfboard 4 x 6 avaliable at Radio Shack (so I've heard...) .
- strips of wood to make the frame. The frame is needed to prevend the perfboard to warp as you weave the caning. I used cedar wood, because that's what I had. You can use any wood you have except balsawood that is too soft and won't make a firm frame!
(1a)- 2 strips of wood: 4 3/16" x 1/2" x 1/32" or 1/16" thick
(2a)- 2 strips of wood: 4 3/16" x 3/8" x 1/32" thick
(3a)- 2 strips of wood: 4 3/16" x 1/2" x 1/16" or 1/8" thick
(1b)- 2 strips of wood: 6 3/32" x 1/2" x 1/32" or 1/16" thick
(2b)- 2 strips of wood: 6 3/32" x 3/8" x 1/32" thick
(3b)- 2 strips of wood: 6 3/32" x 1/2" x 1/16" or 1/8" thick
- white or tacky glue
*Build a rectangular frame using the thicker strips (3 a and b).
*On top of that frame, glue another frame with the thinnest strips (2 a and b), flush with the OUTER side of the first frame.
*Place the perfboard in the center of the frame, same level as the thinnest frame.
*Finally, make and glue the top frame using the remaining strips (1 a and b). Look the picture above for the cross section of the strip 'sandwich'.
*Reinforce the frame with an extra line of glue on the bottom side of the perfboard next to the frame, to strengten the whole jig of framing. Use clamps to keep it all firmly together and let dry. *Sand well and aplly some sealant to prevent thread from being caught.
*I would make the corners round now...(don't leave them square as I did!) just saying!... :)
 |
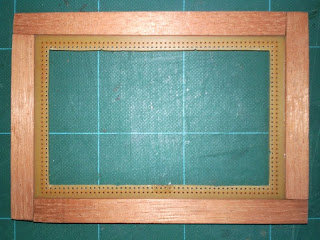
| A moldura pronta! The frame is finally finished! |


Nenhum comentário:
Postar um comentário