
Tramando... :)
IMPORTANTE: Use agulha 26 de bordar. Ela tem uma ponta redonda que não fura o dedo!
A trama toda é feita em 4 'passagens':
1) horizontal
2) vertical
3) diagonal 45 graus => \
4) diagonal 135 graus => /
Eu inverti as duas primeiras passagens (primeiro vertical, depois horizontal), mas isso não afeta em nada. Weaving... :)
IMPORTANT: Use a blunt embroidry needle, so as NOT to hurt yourself! I used #26.
The caning is formed by four threadings:
1) horizontal
2) vertical
3) diagonal 45 degrees => \
4) diagonal 135 degrees=> /
I inverted the first two. Started by vertical and then by horizontal. No problem there.  |
| Primeira passagem. First threading. |
Primeira passagem
Saindo do segundo furo da fileira, vá até o mesmo furo do outro lado e retorne pelo mesmo furo que começou.
First threading
Tie the thread at the second lower hole of the left side and go to the right adjacent hole, then back to the same hole on the left. 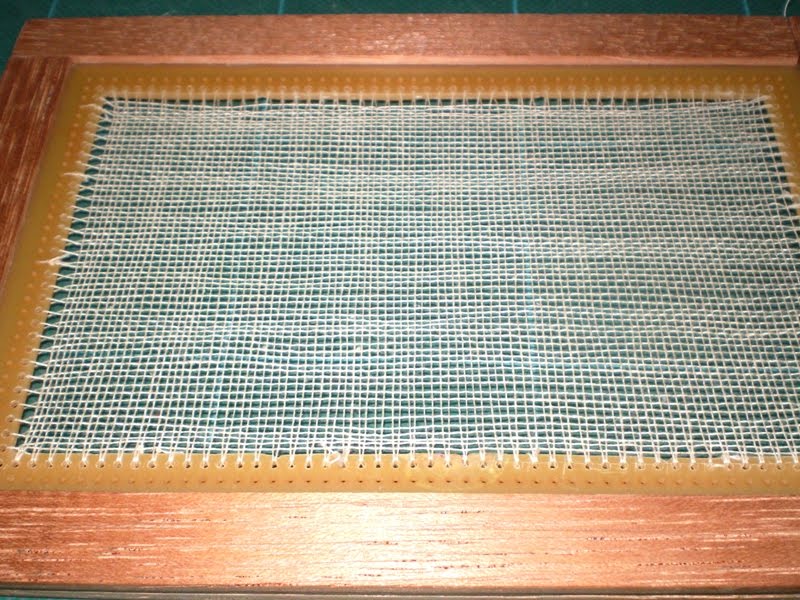 |
| Segunda passagem. Second threading. |
Segunda passagem
Parece muito com alinhavar um tecido. Desta vez, o importante é passar por cima de um fio, por baixo do próximo e assim sucessivamente. Seu mantra nessa fase é simples: "Por cima, por baixo". "Mantras" são repetições que ajudam a não perder o 'fio da meada'... :) Na volta, faça o contrário: "por baixo, por cima..." É nesta fase que user uma madeira mais fina na parte de cima da moldura ajuda muito!
No final, parece uma gaze de algodão, dessas de hospital. Não tem problema, mas se isso incomodar, pode usar um pente fino, para manter os fios no lugar certo. Eu não fiz isso desta vez!
Second threading
Feels a lot like basting when sewing. What is important here is to go OVER one thread and UNDER the next. Your 'mantra' here is "over, under..". 'Mantras' are simple sentences that if repeat while weaving, they'll help you not get lost. When you come back, do the opposite: "under, over..." In this step you'll see how important it is to have used a thinner strip on the top part of the frameIn the end, it'll look a lot like cotton gauze, the hospital kind. Not to worry. If it bothers you, you can use a broken comb to keep threads in place while weaving. I didn't do it this time...
 | |
| Terceira passagem - início. Third threading - beginning. |
Terceira passagem - diagonal \
De agora em diante, parece como bordar. Só que é até mais fácil, pois o 'ponto' vai sempre numa só direção e não tem que se preocupar com o avesso, nem com pontos solitários! :) Passe por cima dos pontos horizontais e por baixo dos verticais. Mantra: "por cima em pé, por baixo deitado" E nada de pensar bobagens, viu? :)
Pode ver que a trama final começa a aparecer e os fios se encaixam no lugar +/- certo. Lembre de dar uma puxadinha leve do fio (cuidado para não arrebentar!) para ajudar a ajustar no lugar.
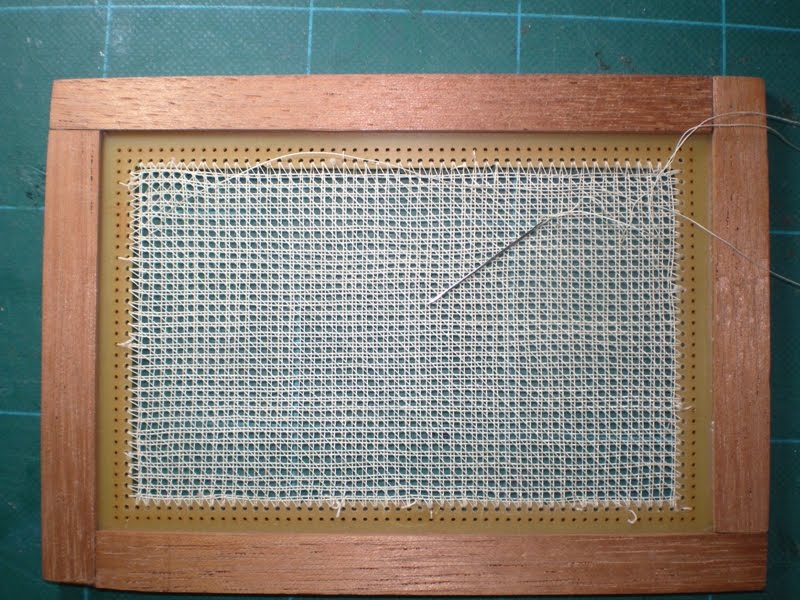 |
| Terceira passagem finalizada. Third threading finished. |
3rd threading - diagonal \
From now on, it'll feel a lot like embroidering. But better, as you'll only work in one direction, no need to worry about the wrong side or with 'orphan' stiches! :) Go under the two companion horizontals and over the two companion vertical canes. Mantra: "over vertical, under horizontal" And no mental jokes! :)Now you can see the caning beginning to take form and that the threads start to fall more or less in the right place. Remember to (very!) gently pull the thread (be careful not to tear it!) to help this adjustment.
 |
| Quarta passagem - início. Fourth threading - beginning. |
Quarta passagem - diagonal /
Finalmente, a última passagem! É igual à terceira, só que o mantra é ao contrário: "por baixo em pé, por cima deitado". Dar uma puxadinha de leve a cada 2 cm é fundamental para a trama ficar correta!
A palhinha está feita!
 |
| Quarta passagem finalizada. Fourth threading finished. |
Fourth threading - diagonal /
Finally, the last threading! It's just like the third one, but the 'mantra' here is the opposite: "UNDER vertical, OVER horizontal". A gentle pull on the thread every inch woked is fundamental to help adjusting in place. The actual caning is now complete!
Acabamento
Se você usou uma linha na cor da palha, é só misturar água com cola branca (meio a meio) e espalhar bem. Dê umas batidinhas com o pincel seco depois para retirar todo o excesso. Repita + 1 vez. Se usou linha clara ou branca, pode pintar com uma tinta acrílica BEM diluída. É preferível pintar mais vezes até achar o tom do que usar uma tinta grossa e ficar feio!
Deixe para envernizar na peça, quando for envernizar a peça toda.
Use uma tesoura bem afiada para cuidadosamente cortar a palhinha da moldura. Deixe sempre na posição horzontal e em superfície plana.
Finishing
If you used a colored thread, all you have to do now is to use a 1:1 mixture of white glue and water and spread over it with a brush. Make sure it doesn't have any lumps, use a dry brush for that. Led dry flat. If you used white thread, use a wash of color of your preference. I used ocre tones. Apply as many layers as you need until you get the right shade.Leave any varnishing to be done when you have the finished piece of furniture, so you can do it all at once.
Use sharp scissors to carefully cut the swatch from the frame. Let lay flat.
 |
| Finalizada, colada e tingida! Finished, 'glued' and dyed! |
Nenhum comentário:
Postar um comentário