
Last month I got a VERY special gift!!! Sheila Cristina, a miniaturist from Belém, Para (North of Brazil), a faithful follower of DHB and my personal blog (this very one...), happens to be a specialist in creating miniature sculptures of bride & grooms for top-of-the-cake. I made her a sofa set in 1:24 and, in return, she decided to make a mini version of me... :) I didn't make her work easy at all, as I absolutely hate to be in pictures, so I didn't have any good ones to send her so she could base her work on. Only a very old one... But I was very fond of the idea of having miniatures of my 'furry children', Garotão (Big Boy), a 18-years-old dog I adopted when he was 6 (he had been abandoned on the streets by his previous owner's family, after he died) and Bianca, a cat I also adopted but that has already crossed the Rainbow Bridge in November 2011, at the age of 17 1/2.
E quando o presente chegou, fiquei absolutamente maravilhada! Até minha mãe viu a semelhança. E ainda ganhei uma mesa com mini-dollhouses em andamento, que lindo!!! Bem, um presente desses merecia um cenário próprio, claro... Eu não tinha nada que coubesse, pois estão na escala 1:6 (mais adequada a noivos de topo de bolo, a especialidade da Sheila).
When that special gift arrived, I was in awe! Even my mother could see the resemblance. And I also got a mini-desk with mini-dollhouses in progress, so beautiful!!! Well, such a great gift deserves nothing less than a setting of its own, of course... I didn't have any roombox that would fit them, as they are in 1:6 or playscale (which fits better for her work)
 |
| A mini-eu com a 'Bianca' no colo... Mini-me with 'Bianca' in her arms... |
I found a 'hollow niche' a crafts store in the city:
 |
| O que comprei é 30x30x15 cm The one I bought was 12x12x6 in |
- Do lado de fora, fiz um trabalho que misturava pintura e tecido, arrematado com passamanaria.
- Por dentro, usei duas folhas de scrapbook na cor lavanda que já tinha comprado há algum tempo.
- O acabamento foi com fita de scrapbook que também já tinha
- O rodapé também já tinha comprado, na miniatures.com quando comprei para a loja do século 19...
Ok, so I'm on a very tight budget right now, therefore, I tried to make the best of the stash I already had...
- Outside I decorated with paint and fabrics, finished with a trim.
- Inside, I used two scrapbook (lavender) sheets I've had for a while
- The finishing for the 'wallpapers' was made using a scrapbooking ribbon I've had for a while too
- I also had the baseboard, I had bought at miniatures.com when I bought the one I used on my 19th century store (on hold for now...)


- E para o piso?... Bem, para o piso resolvi fazer uma técnica que já tinha lido a respeito e eu já tinha até recomendado para fazerem: piso de taco usando palitos de picolé! São baratinhos, um saco com uns 50 custa só 99 centavos
- What about the flooring?... Well, for the floor I decided to try a technique I read about a long time ago and I had even recommended it to other people: parquet flooring using popsicle sticks! They are very inexpensive, as one bag with about 50 of them costs less then 50 cents (of a dollar).
- os palitos têm espessura e largura variada, muito difícil de conseguir um acabamento perfeito (eu sou chata nisso...)
- são mal lixados (nem sei se teria coragem de usar algum para seu propósito inicial, como picolé que se leva à boca!)
- a madeira, apesar de quebrar fácil, é DURÍSSIMA, muito difícil de cortar contra o veio, para fazer os tacos. Como tinha que cortar muitos, só consegui cortando com a dremel.... Improvisei uma 'guia' de corte, mas não gostei nada....
- o tamanho dos palitos é ideal para 1:6, como este cenário provou... Não serve para 1:12!!!!
- deu MUITO trabalho para lixar depois de colados, para deixar todos no mesmo nível, levei 3 dias nisso, lixando manualmente. Acho que uma lixadeira orbital vai entrar na minha lista para o Papai Noel, hehe...
Well, I can assure you I'll NEVER again recommend this technique!... hahaha... The final effect is beautiful, but...
- the sticks come in different thickness and width, a nightmare for achieving a perfect finishing and fitting (I'm pretty picky about this)
- they are extremely rough. So bad I'm not sure I'd ever use them for their intended purpose (holding popsicles which are to be put in the mouth! Tell me about splinters!...)
- the wood they're made of, though easily breakable, is really HARD to saw (perpendicular to the vein), which is necessary to obtain the pieces in the right size. I could only manage to do that using my dremel tool. As I had to cut many of them, I improvised a cutting jig, but I hated working with that wood...
- Their size is ideal for 1:6, as this setting proves it... NOT good for 1:12!!!
- it was A LOT of work to sand them after glued in place, in order to make them even (level 'down'). It took me 3 days of hard work and manual sanding. I think that an orbital sander will make it to the list I'm sending to Santa this year, lol...
 |
| Esse montinho não dá nem para o começo, hehe... This pile won't fill half of the floor, lol... |
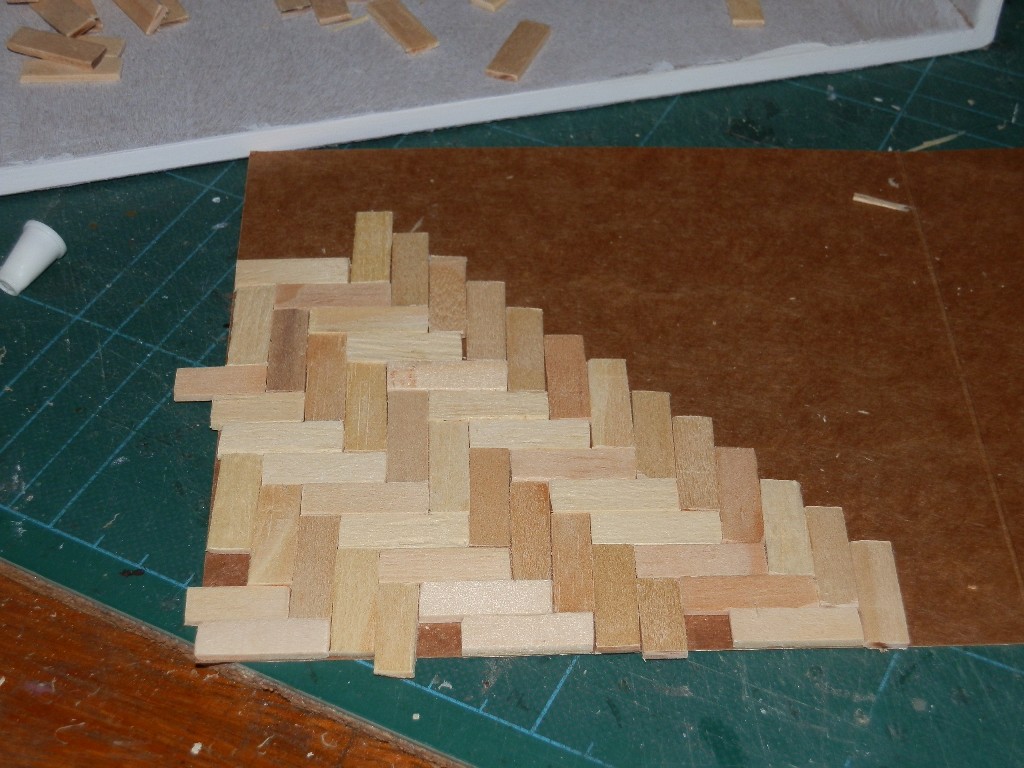 |
| Começando a fazer o piso.... Begining the parquet floor |
 |
| Piso totalmente colado na base de papel-cartão. Finished gluing the parquet floor on the card base. |
 |
| Dá para ver como fica irregular na altura. E os espaços entre os 'tacos'! (preenchi com cola e pó de serragem) You can see the different 'heights' of the wood pieces and the spaces between them (I filled those with a mix of glue and sawdust). |
 |
| Piso terminado, 'sintecado' e colado no lugar. Finished floor: sanded, varnished and glued in place. |
Outro detalhe interessante é que eu tinha uma lanterninha bem xing-ling, de led e com pilhas de bateria redonda. Desmontei ela toda, ampliei os fios (com solda) e usei um micro-interruptor que comprei em uma loja de materiais eletrônicos, a 90 centavos cada. Usei a dremel de novo para criar as ranhuras para que os fios não aparecessem sob o papel de parede. A luminária do teto é da própria lanterninha que comprei... O pacote dos correios no chão simboliza um igual onde veio meu presente e ainda serve para esconder as baterias!...
Another interesting detail is that I had one of those cheap LED flashlights 'Made in China', the kind that uses small round coin batteries. I took it all apart, extended the wiring (had to use soldering iron here) and a micro-switch I bought online from an electronics store for $0.50 each. I used my dremel again to create some grooving where I'd fit the (round) wires, so that they wouldn't show beneath the wallpaper. The light fixture on the ceiling is actually the top of the flashlight itself... The postal package on the floor symbolizes the one that brought me the actual gift AND also hides the batteries!...
 |
| Entalhe para encaixar os fios... Grooving to fit the wiring.... |
 |
| detalhe onde ficará o interruptor close-up where the switch will be |
 |
| o interruptor pronto the finished light switch |
 |
| cenário iluminado, no escuro setting: lights on, while outside is dark |
 |
| cenário iluminado, no claro setting: lights on, daylight |
E, mais uma grande surpresa, hoje recebo outro presente, da queridíssima Edi Oliveira, que faz essas ma-ra-vi-lho-sas orquídeas em biscuit. AMEI!!! Como ela adivinhou que lilás é minha cor favorita???? Acho que ela deve abrir uma loja online e vender suas criações únicas para o mundo, vocês não acham? :)
And as if that wasn't enough, to my greatest pleasure, another wonderful surprise: yesterday I got yet another gift, from my dear friend Edi Oliveira, a super-talented miniaturist who makes GORGEOUS orchids, out of cold porcelain. I LOVED it!!! How did she guess that my favorite color IS lavender???? (the actual color doesn't show well in the picture, though). I think she should open an online store and sell her OOAK creations to the world, don't you think? :)

 |
| Obrigada! Thank you! |
buen trabajo!
ResponderExcluirGracias Carmen! Espero ter feito justiça ao lindo trabalho da Sheila!...
ExcluirOi, Evelyne! Já estava sentindo falta dos seus posts! rsrs.
ResponderExcluirMas que presente maravilhoso e especial você recebeu hein!!! Ficou o máximo! Muito legal mesmo, ainda mais com sua gatinha e seu cachorrinho! Amei!
E você criou um lindo cenário para este presente especial! Pode ter sido traumatizante trabalhar com os palitos de picolé... rsrsrs... mas no final ficou ótimo!
A orquídea que vc ganhou da Edi também é um primor! As orquídeas que ela faz são maravilhosas e ela é uma pessoa maravilhosa também! Também acho que as orquídeas da Edi devem ganhar o mundo!!! hehe.
Um beijão,
Mariana.
Obrigada Mariana... Estava esperando o ferro de solda chegar para iluminar a 'Casa Toscana' (demorou demais, cancelei, comprei em outro lugar...) e aí chegou meu presente e fui trabalhar nele, por isso sem postagens até concluir, rsrs...
ExcluirEsse piso ficou lindo. Ao vivo, dá para ver os veios da madeira mudarem de tom e brilho conforme o ângulo. Mas sinceramente, é o tipo de coisa que se faz uma vez só. Minha mãe falou: "que nada, recomende que todo mundo faça, assim vão sofrer também e valorizar mais seu trabalho"... kkkkkk!!!!
A Edi é 10!! Um anjo de pessoa! Estou torcendo pelo sucesso dela. E as orquídeas, são de babar!
The floor looks wonderful, I know how difficult the sticks are to cut so very well done on doing a lovely job.
ResponderExcluirThank you Ann! To be honest, I really did love the final result. But I'm glad you appreciate how hard it is to cut/sand them. I was hoping they would be easier to work with abroad, but they seem to be the same everywhere, right? :)
ExcluirThey are really really tough to cut with a saw or a knife, when I tried to cut them with scissors they just splinter. I wonder what wood they are made of.
ExcluirYeah... I'm telling you, the only way I could do it was using the dremel (with those brown cutting discs...)
ExcluirAllegedly the sticks are made of Pinus, but pine wood shouldn't be that hard to cut, so my second guess is eucalyptus. Both are trees usually used in 'afforestation' or a plantation of trees to be used as a source of wood for industrial purposes.
Your YOU is gorgeous and so life like! The room you made for YOU is just right. I think I might be brave enough to try the parquet floor just because you were able to pull it off. Thanks!
ResponderExcluirThank you! :)
ExcluirI'm not trying to encourage you (because it IS a LOT of work...) but the finished floor is stunning, pictures won't do it justice. The wood shines differently depending on the angle you look from, just like real floor.
Keep me posted on your progress, I'd love to see it! :)
Nooossa Evelyne, que lindo cenario vc fez. Vc é uma artista fantasticas, ficou muito lindo. gracas a Deus vc fez a diferenca na peca. Muito lindo. E esse interruptor q nem aparece o fio, nossa muito lindo. PArabens querida.
ResponderExcluirVc é uma mestre. bjao
Sheila,
ExcluirVc nem imagina como fiquei feliz em saber que vc gostou!!!
Mas protesto: não fiz diferença alguma na peça, ela já era totalmente linda por si só. Apenas procurei dar a ela um cenário à altura. :)