
I'll have two store shelves, one on each side of the store. If I also include balconies on each side, it would leave almost no space in the middle of the store for my "customers" to circulate. So, I decided on a different approach. One that is often used in fabric stores here in the city. Instead of balconies, they have shelves full of fabrics and a large table somewhere where the salespeople unwind the fabric bolts for the customers to examine, cut the amount the customer wanted, etc.
Dê uma olhada nessa linda mesa usada na minha loja de tecidos favorita aqui na cidade:
Look at this beautiful table used at my favorite fabrics store here:

Eu queria usar uma dessas mesas de cozinha em miniatura, que geralmente vemos em cenários na internet com comida sendo preparada. Até que não são tão caras, mas juntando o custo do frete e a demora, desanima qualquer um! Isso se a alfândega não resolver aplicar a taxa de importação, aí o preço dobra, porque aplicam sobre o valor do frete também!...
I wanted to use one of those utility tables, that we often see in miniature preparation scenes all over the internet. I know they are not expensive. But keep in mind that whatever I buy, I have to pay for international shipping. Even if I could buy one on ebay for 99 cents, I'd have to pay $15 dollars for shipping. And if customs decides to charge me import taxes, the cost would double. Yes, they do apply taxes on shipping costs...
Por isso resolvi fazer eu mesma o máximo de itens para a loja que conseguir fazer. E a mesa central definitivamente seria um deles! :)
So, I have made up my mind to make myself as many items I could. And the central table would definitely be one of them! :)
Não vou mostrar o passo-a-passo da elaboração da mesa. Na verdade, fiz uma de "teste", sem planejar nada. Só tirei umas medidas e fui logo cortando a madeira balsa. Eu tinha umas peças torneadas reaproveitadas, usadas originalmente como corrimão (guarda-corpo) que usei como pernas da mesa. Usei esse tutorial que achei na internet como base para montar minha mesa.
I'm not going to show you step-by-step of my table. Actually, I didn't plan it at all. I took some measures, cut some wood, used some second-hand balusters I had, and just used this tutorial, by St. Albert Mini blog, as a base to make my own.
Eu queria que a mesa tivesse uma aparência de bastante uso. Então, marquei os veios da madeira com uma ponta seca e consegui dar à maderia balsa um jeito gasto, mas limpo. Para conseguir isso, lixei a madeira e apliquei uma camada de verniz à base de água, fosco. Lixei ligeiramente de novo depois de seco. Quando trabalho com a balsa, eu sempre uso uma lixa muito fina, como 400 ou mais fina (ou então reaproveito lixas um pouco mais grossas mas muito usadas...) :) Daí diluí um pouquinho de aquabetume em água e misturei um pouco de verniz brilhante à base de água. O bom de fazer bem diluído é que vc vai aplicando as camadas até chegar no tom que deseja. Depois de seco, esfreguei cera de abelha e "poli" usando um saco de papel (kraft) que tenho guardado para esse tipo de uso. Isso mesmo, usei papel para dar polimento! Dá um brilho bem bonito e natural!
I wanted it to have a battered look. So, I emphasized the wood veins and gave the balsa wood a weathered, yet clean, look. To achieve that, I sanded the wood, and applied a coat of water based matte varnish. Slightly sanded again after dry. When working with balsa wood, I always use a very fine grit, like 400 or higher (or very well used lower grits...) :) Then I diluted water based bitumen craft paint - you can use any water based brownish color you want - make a wash of it = a little bit of paint mixed with a lot of water. Apply as many coats as needed to achieve the desired shade. After dry, I rubbed beetle wax all over the surface. Then rub the wood with a piece of kraft paper. Yes, you read it correctly! I saved a paper bag for this kind of use only. It gives a nice natural shine!
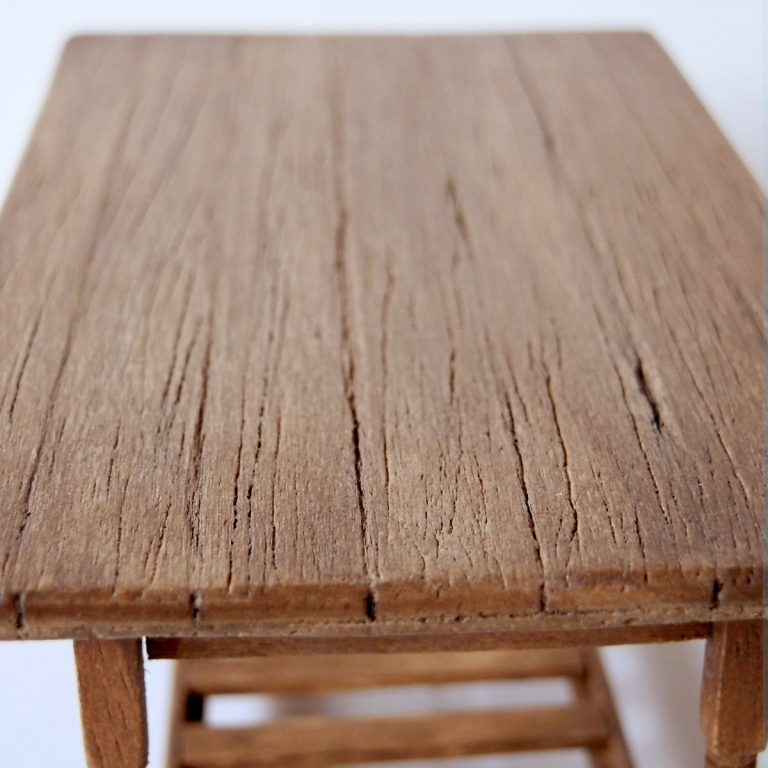
Ok, chega de falar. Aqui está o resultado final. Eu até queria fazer uma mesa diferente, mais parecida com a mesa da loja da minha amiga. Essa versão era só um teste. Mas gostei tanto do jeito que ficou a madeira, tão natural, que decidi ficar com ela e usar na loja! :)
Ok, so this is the final result. I was going to make a different one, more similar to the table at my friend's RL store. But I'm so pleased with the look I achieved on the wood that I decided to keep and use this one as is! :)


 |
| Obrigada! Thank you! |

What a great job. You make it seem so easy by just thinking of it then making it!
ResponderExcluirLa mesa te ha quedado muy bien,me gusta mucho el envejecido que le has hecho!!!!
ResponderExcluirBesos.
Hell oEvelyn,
ResponderExcluirFantastic work ont he ebautiful table. It looks so relaistic, just like an old, used table. It will be perfect in your shop. Bravo!
Big hug,
Giac
This table is perfect for your shop. A great job.
ResponderExcluirBye, Faby
Thank you! Gracias! :)
ResponderExcluirGrandmommy, it IS actually pretty easy. The real "secret" lies in the cutting. The same rule applies in miniature as in RL woodwork: measure twice, cut once. Whenever I have to redo something is because I miscalculated... :)
And the second secret is: "let it dry". This one is particularly difficult for me to follow. I have to walk away and do something else. Or else... :)
If you follow that tutorial on the link, you'll see it's pretty simple & easy.
Hi Evelyn! You have made the balsa wood look BETTER than balsa wood usually gets credit for! Most of the time it is overlooked and underused in the miniature world! I like the fact that you have used the porous nature of the wood and worked with it to make it look like a higher quality wood that has just gotten old with usage! Maureen, at St. Albert Minis would be proud! I am now greatly tempted to try and make a table like this myself!
ResponderExcluirelizabeth